Complex Table Manipulation-Tables within tables |  |

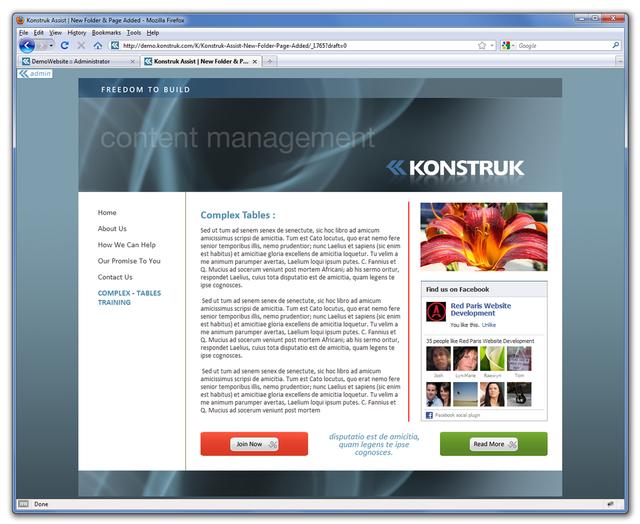
We are going to show you how to create the example in figure 30. The first thing to do is sit down with a piece of paper and draft up how you would like your page to look.
When you are drafting up your layout you should know the width of your content block and how high your page is going to be approximately. This will allow you to work out image sizes after taking into consideration all padding and margin dimensions.
As with everything there is always many different ways to achieve the same result. For this example we have made it complex so that you can learn how to manipulate tables and read the path correctly.
This layout has been made up of a total of 8 individual tables comprising of differing columns and rows and has a mixture of left, right, top & bottom padding and one set of top margin on the tables.
Remembering that percentages are used in tables and that padding must be removed from the percentages, will we step you through the safest way to create this layout for all browsers and monitors. Another thing to remember is that
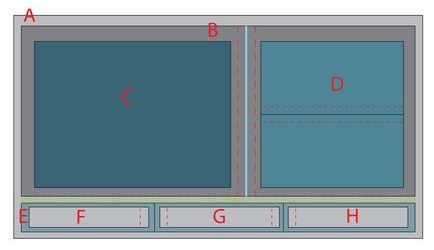
This diagram shows you how the tables are going to be inserted into each other and where the padding (red dotted line) and margin ( green shaded area) are located. Note that we also have a 2 pixel border between C and D tables that we have applied to the B table.
The easiest way to create the end result is to create all the tables separately down your page.
- TIP/ Create a bunch of lines by hitting enter in your content page as if you start your tables at the very top of the page sometimes it is hard to get ‘outside’ your tables again.
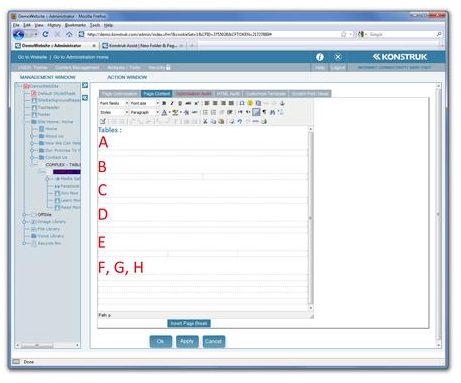
First lets create all our tables individually.
- TIP/ Place the letter of reference within each table and table cell for easy identification once you have inserted them into each other
- The base table - 1st in Path - 100% of the content block - 1 col x 1 row - 0 padding and 0 spacing - Cell Labelled A
- The top half of the table - 2nd in Path - 100% of table A - 2 col x 1 row - 0 padding and 0 spacing - Cells Labelled B(i) & B(ii)
- The LH side of top half of the table - 3rd in Path - 100% of LH column of table B - 1 col x 1 row - 0 padding and 0 spacing - Cell Labelled C
- The RH side of the top half of the table - 3rd in Path - 100% of RH column of table B - 1 col x 2 row - 0 padding and 0 spacing - Cell Labelled D(i) & D(ii)
- The bottom half of the table - 2nd in Path - 100% of table A - 3 col x 1 row - 0 padding and 0 spacing - Cell Labelled E (i) & E(ii) & E (iii)
- The LH table of the bottom half of the table - 3rd in Path - 100% of table E col 1 - 1 col x 1 row - 0 padding and 0 spacing - Labelled F
- The Middle table of the bottom half of the table - 3rd in Path - 100% of table E col 2 - 1 col x 1 row - 0 padding and 0 spacing - Labelled G
- The RH table of the bottom half of the table - 3rd in Path - 100% of table E col 3 - 1 col x 1 row - 0 padding and 0 spacing - Labelled H
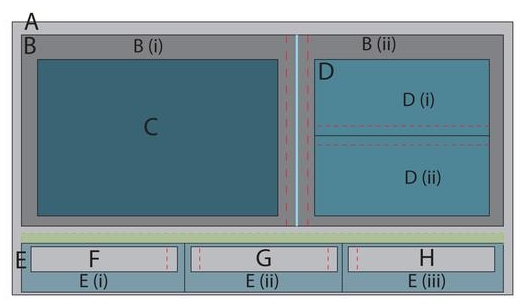
Now that you have created the tables separately it is time to insert them into each other.
Create a bunch of lines in the individual Table A created above by hitting enter in table A. This makes it easier for placing all the individual tables into Table A ... you can always delete the lines after.
Place your cursor into Table B, select “table” from the Path: then ‘ctrl x’ to cut the table from the page, place your cursor into Table A and ‘ctrl v’ to paste the cut table.
Place your cursor into Table C, select “table” from the Path: then ‘ctrl x’ to cut the table from the page, place your cursor into Table B left hand column and ‘ctrl v’ to paste the cut table
Repeat this process until all your tables have been inserted within each other as per this diagram or your scrap paper.
Now it is time to do all paddings, margins and borders. Refer to back to your paper draft.
Remember you can always come back and fix any errors, nothing is set in stone.
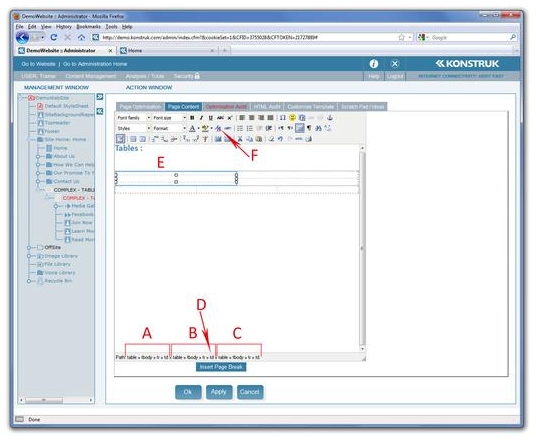
Place your cursor in Table C and read the Path at the bottom of the page.
- This is the first table of the group. The path reads from the outside in. So in this instance it is referring to Table A
- This is the 2nd table of the group. In this instance it is referring to Table B
- This is the 3rd table of the group. In this instance it is referring to Table C
- Select the td of Table B
- Make sure that the correct table cell is highlighted for the changes you wish to make
- Select the Edit CSS Style button from the editor tool bar
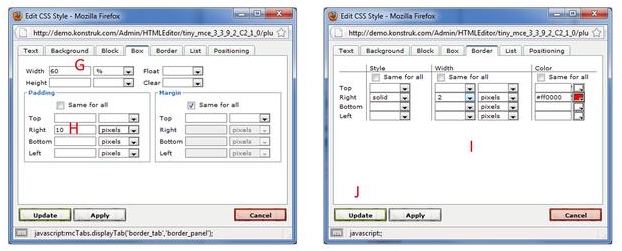
- In the pop up box, go to the Box Tab and make the width of B(i) to 60%. This achieves the Table C (which is 100% of B(i)) to be wider
- We also need to move the text that will eventually be in Table C away from the RH edge of B(i). We have chosen to make this change in B (i) as we are already making several CSS style changes to that cell and thus it makes it easier to locate at a later date if necessary. Remember that Padding in on the inside of the cell and this is what we are needing to do to B (i), untick the same for all box and add a 10 pixel padding on the Right Hand Row. This means that all text in Table C will be fully left aligned and justified with the rest of your page content.
- Swap over to the Border Tab in the say pop up box as we wish to keep it as easy as possible to find any CSS Style changes we are also going to create the border on B(i) cell. On the Right Row complete as required.
- Say Update
Repeated for all cells as below -:
td - Cell B(ii) - Edit CSS Style
Block Tab - To ensure that all images, galleries or text align to the right hand side, make the Text Align “Right”
Box Tab - Padding left of 10 pixels
td - Cell D(i) - Edit CSS Style
Box Tab - Padding bottom of 10 pixels
td - Cell D(ii) - Edit CSS Style
Box Tab - Padding top of 10 pixels
table - Table E - Edit CSS Style
Box Tab - Margin top of 20 pixels - remember padding on the inside and margin on the outside of a table
td - Cell E (i) - Edit CSS Style
Box Tab - 33% width - 3 columns on bottom therefore 100% by 3 is 33%
NB/ It is safest to allow code to do correct additions, we are only going to specify width in B(i) and B(iii) and let code define B(ii)
Cell E (ii) - no width specified as allowing code to do the calculation from E (i) and E (iii)
td - Cell E (iii) - Edit CSS Style
Block Tab - Text Align “Right”
Box Tab - 33% width
table - Table F - Edit CSS Style
Box Tab - Padding left 10 pixels
table - Table F - Edit CSS Style
Box Tab - Padding right 10 pixels
table - Table G - Edit CSS Style
Box Tab - Padding left 10 pixels - Padding right 10 pixels
table - Table H - Edit CSS Style
Box Tab - Padding left 10 pixels
The above will look like this in your administration screen when completed
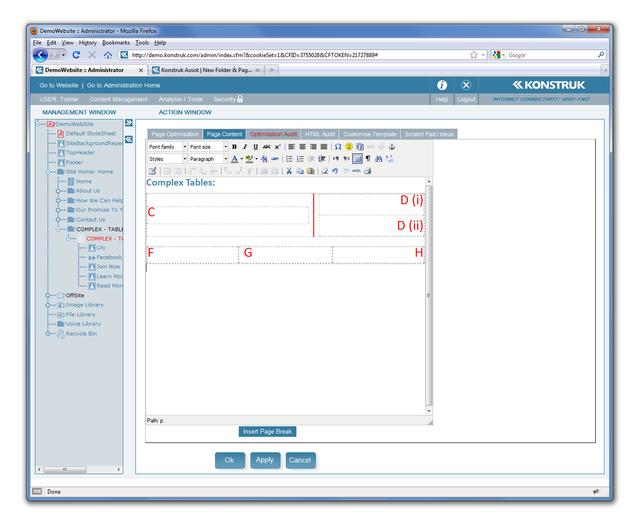
It is now time for the fun part - inserting all the content, images or files you wish displayed.
Referring back to your paper draft you can see which tables you are wishing to insert into. This shows you the content Editor of the end result.
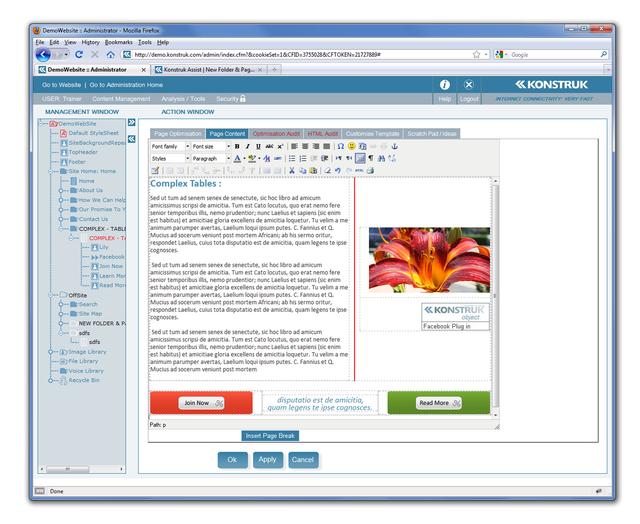
When you place things into your tables you may find things that you have forgotten in the base layout. i.e. Table C we wished to have top aligned, and Table G we wished to have center aligned. All these can be done by selecting the correct td from the Path again, going back into your Edit CSS Style and updating or changing.
The end result can be seen below.
- TIP/ view it in draft form constantly, as what you see in your editor may not be a direct representation of the end product due to monitor constraints.
