Adding an Image - Upload |  |
Catch phrase to remember and recite ...
We recommend that the image is uploaded to the page it will be visible on. There are some exceptions, i.e. Galleries, but for the purpose of this manual we are going to deal with Single Image Uploads.
UPLOAD
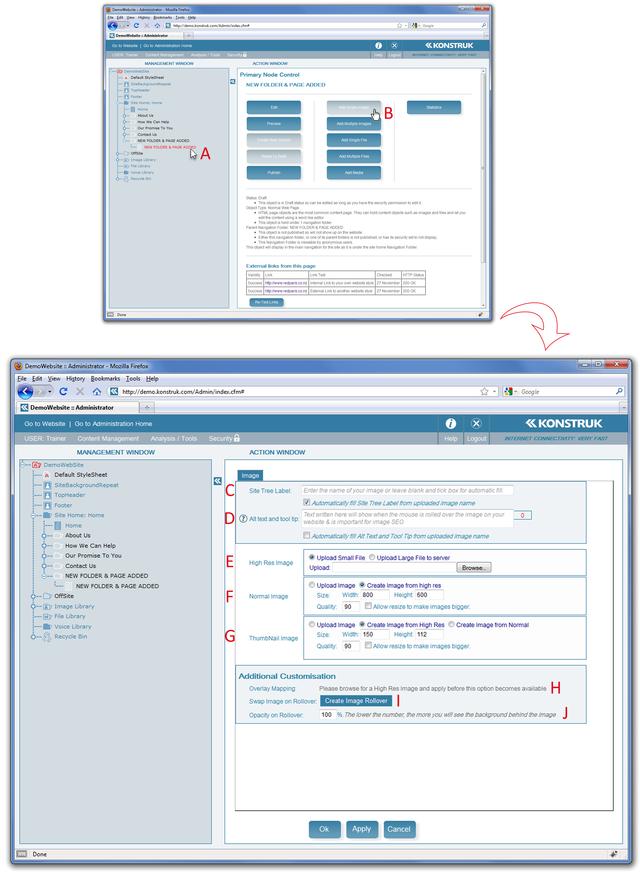
- Ensure you have the Action Window at the Primary Node Control Screen and select the page you are adding the image to.
- Select the button for Add Single Image. You will be taken directly to the next screen.
- NB/ All our image files hold three different sizes, High Res Image, Normal Image, Thumbnail Image.
- Site Tree Label - generally this will be left blank as the name of the image on your computer will default into this field when the "Automatically fill Site Tree Label from uploaded image name" tick box is selected.
- Alt Text and Tool Tip - text written here will show when the mouse is rolled over the image on your website & is important for image SEO. If you have been verbose when naming the image on your computer you may wish to select the "Automatically fill Alt Text and Tool Tip from uploaded image name" tick box to save time.
- High Res Image - this is the portion of the image file that has the largest image uploaded from your computer. Select the Browse button and find the image on your computer.
- Sub Point 1/ most photos coming straight out of a camera are around 2000 to 3000 pixels wide.
- Sub Point 2/ a Large File is anything that is above 5mb, so generally you will leave the selected radio box "Upload Small File" as default.
- Normal Image - leaving the default setting of "Create Image from high res" means that the system will create this portion of the image from the uploaded High Res Image file from your computer. You can upload the image to this section if you so desired.
- Sub Point 1/ a standard small laptop screen is width 1024 x height 768 pixels, the default pixel size the system has is width 800 x height 600 pixels.
- Sub Point 2/ if you wish to force a width of the normal image that is going to be created, i.e. you wish it to be 600 pixels wide, then change the boxes to be 600 x 0 and the width will be exactly that leaving the height of the image to be whatever the original constraints are.
-
- NB/ if you are going to insert the normal image into your page, be aware of the width of your content block area.
- Sub Point 3/ Quality at "90" is normal and we recommend you leave this as default
- Sub Point 4/ Allow resize to make the image bigger - e.g. if you know that your uploaded High Res Image is only 400 x 200 pixels, you may wish to have your normal image 600 x 400 pixels, tick this box and then alter the width and height accordingly
- NB/ resizing images bigger can make them fuzzy and pixelated.
- Thumbnail Image - the same qualities apply as for the Normal Image
- Overlay Mapping - allows you to select all or part of your image and have links through to other pages on your website or external websites.
- Swap Image on Rollover - allows the end user to have a different image when they mouse over the original in the page.
- Opacity on Rollover - allows the end user to see a fade out of the image when they rollover. It is used when you have a link or a pop up on the image to give a visual indication that the image has an action on it. 100% is no change, most commonly used 80%.
Say OK to return to the Primary Node Control Screen.


